Installing Ubuntu 14.04
Ubuntu What?
Ubuntu is a (free) community-based Linux distribution. The desktop version feels rather similar to Mac with a “Finder”, icons to start apps, browsers and everything else users of commercial operating systems are accustomed to employing.
Very Important!
DO NOT USE OS X, WINDOWS OR ANYTHING EXCEPT UBUNTU 14.04 LTS!
If you go to the ROS installation page, it says there is an “experimental” version of ROS for OS X. It’s experimental for a reason – you’ll run into serious problems following this tutorial.
Did Linux and ROS Come Pre-Installed with TurtleBot?
If you purchased TurtleBot and it came pre-installed with Linux and ROS, you should check which versions shipped with your computer. You can find out which version of Linux you have by opening a terminal (ctrl + alt + t) and typing:
lsb_release -a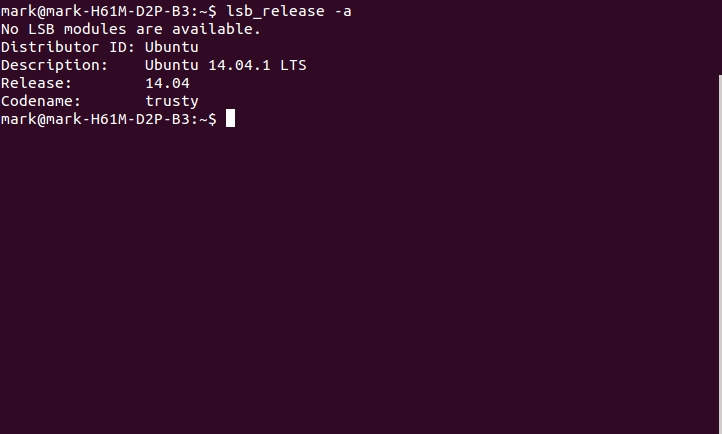
Results of “lsb_release -a” in Terminal
You can check which distribution of ROS you have by running:
roscore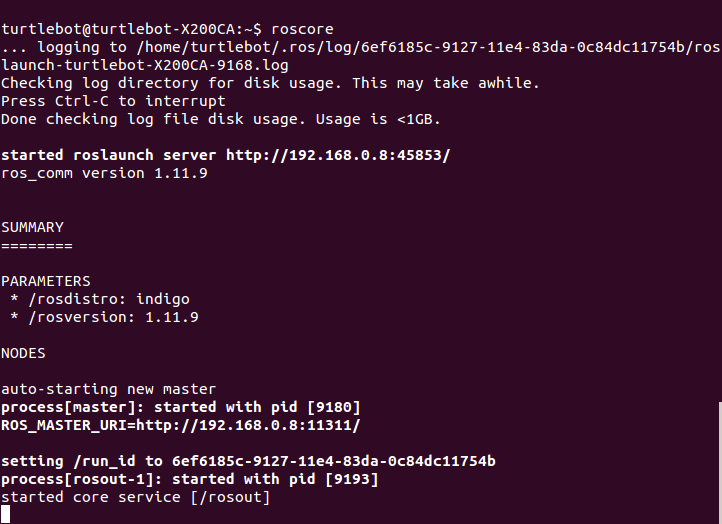
“roscore” Runing in Terminal
If you look below the PARAMETERS heading, you’ll see /rosdistro:.... Whatever is written next is the name of your ROS distribution. In our case it’s indigo, which is what we want.
When we purchased our TurtleBot 2 in September 2014 it shipped with Ubuntu 12 (12 being the version #) and ROS Hydro (Hydro being the distribution release’s name). The developers of ROS highly recommend using Ubuntu 14.04 LTS and ROS Indigo instead.
Why Should I Use (or upgrade to) ROS Indigo and Ubuntu 14.04?
Both Ubuntu 14.04 and ROS Indigo are LTS (Long Term Support), meaning that you can depend on it for years. ROS Indigo is specifically designed to work with Ubuntu 14.04.
ROS Hydro and earlier distributions are not LTS.
TIP: The recently added “Jade” distribution is not LTS.
How to Install Linux
We started with two Windows computers and installed Linux instead. As we mentioned in a previous post, you have the TurtleBot netbook and a workstation. You’ll install Ubuntu Desktop 14.04 LTS on both of them using the same process.
Create Installation USB drive
First download Ubuntu Desktop 14.04 LTS on a Windows machine (virtually everyone will need the 64-bit version but if you are concerned here are instructions on how to check if you are 64-bit or 32-bit). Follow these instructions to create an Ubuntu-bootable USB drive.
TIP: Newer releases of Ubuntu Desktop (including 14.10) are not compatible with ROS.
Boot Via USB
After the USB drive is ready, connect it to the computer you want to install Linux on and reboot the machine.
You’ll need to get to the Boot Menu by pressing the appropriate function key during boot-up. Typically this is F12 or F8, but it could be any of them. You should then see an option to “Select a Boot First Drive”. Choose your USB drive (ours was called “USB-HDD”).
Another option if you are having trouble with the Boot Menu is to boot it into BIOS mode (another function key depending on your computer). Then go to “Advanced” and “Set First Boot Drive” to “USB-HDD”. Save and continue.
Install
If you’ve set the correct Boot Drive you should see a few different options. The first one is “Try Ubuntu”; skip this as we are going to commit! Select “Install Ubuntu”. In the “Installation Type” settings we recommend “Erase”.
From here things are pretty much the same as installing any other OS. Select a timezone, language, keyboard layout, etc. On the TurtleBot netbook it’s traditional to set the username and password to “turtlebot”. This isn’t mandatory but will help with following our tutorials.
Troubleshooting: You only see a black screen after you boot Ubuntu for the first time
We did have issues with one ASUS X200M netbook that after we installed Ubuntu it loaded with a black screen and Ubuntu never loaded.
This was because the intel graphics card wasn’t installed correctly by default.
To fix this, you have to boot Ubuntu in a “safe mode” to get past the graphics issues and load Ubuntu, then you can fix it.
- Read this forum thread and scroll down to “Black/purple screen after you boot Ubuntu for the first time”. Follow the “nomodeset” instructions so you can boot into Ubuntu.
- Check if you are using an intel graphics card by running:
lspci | grep VGAIf yes:
-
Download the Graphic Installer for Ubuntu 14.04, 64-bit. NOTE: this link didn’t work on Mac, it tries to load but never succeeds - it will work in Ubuntu.
-
Install by running:
sudo intel-linux-graphics-installerTIP: we tried running the installer in the Ubuntu software center but this did not work. We needed “sudo”.
Reboot.
Opening a Terminal Window
If you’re not familiar with opening and adding new terminal windows, we’ve prepared a short video tutorial to get you started:
Add Terminal to Launcher
Quick Course on Commands
If you’ve never used Linux before, take a moment to review tutorial one and tutorial two. Three and beyond are not required for the following tutorials.