Charging the Netbook
By default, when you dock to the charging station the Kobuki base will charge but the netbook will not charge. The Kobuki base includes a 19v 2a power rail that allows you to autonomously charge the netbook as well.
How to Check the Polarity:
Make sure you check the polarity after you have modified your cable. This is explained in detail below.
Checking Polarity of Barrel Plug to Laptop
You’ll need a multimeter (and potentially a thin wire if the positive lead is thicker than your netbook’s barrel plug).

A Basic Multimeter
Special Thanks
The rest of this article was written by Clearpath Robotics, who graciously provided us with permission to make a copy of their content. Some of the images were updated from the original document for clarity. The original document is available on Clearpath Robotics website where you can also buy prebuilt TurtleBot 2s (including the model we used to test this tutorial).
Modifying Your Laptop Power Cable
Copied with permission from Clearpath Robotics.
This section is aimed specifically at those users who bought a Parts Kit and have their own Laptop which they would like to use with their TurtleBot.
WARNING: This action will most likely void the warranty on your computer. Tread carefully, and proceed at your own risk.
NOTE: The 19V power rail is powered only when the Kobuki is plugged in or docked for charging. The laptop cannot charge during operation; the Kobuki must be charging also.
The Robotsmiths strongly recommend that you read through the instructions BEFORE beginning, and that you follow along with the instructions as you modify your power cable.
Tools Required
- Side Cutters
- Ruler
- Wire Stripper
- Terminal Crimper
- Heat Gun
- Soldering Iron
Parts Required
If you do not have experience crimping wires, buying spares is recommended.
- 1x Unmodified Laptop Power Cable
- 1x Four position Male Molex Connector (Digikey P/N: WM3701IND)
- 1x Four position Female Molex Connector (Digikey P/N: WM1018IND)
- 2x Male Crimp Cable Ends (Digikey P/N: WM2502IND)
- 2x Female Crimp Cable Ends (Digikey P/N: WM2501CTIND)
- 2x Piece of Heat Shrink, 2” length ((Digikey P/N: EPS2316IND)

Wire Stripper / Crimper (Left), Side Cutter (top, center) and Unmodified Laptop Power Cable (Right)

1x Four Position Male Molex Connector (Left) and 1x Four Position Female Molex Connector (Right)

2x Male Crimp Cable Ends (Top) and 2x Female Crimp Cable Ends (Bottom)

Heat Shrink (Left) and Heat Gun (Right)
To start, measure 2ft. from the ferrite bead shown in the picture below.
NOTE: Our netbook shipped without a ferrite bead as shown below.

Power Cord
Snip the cord at 2f, shown below. You now have the Power Adaptor section and the Laptop section. The laptop section is the one with the barrel plug that is inserted into the Laptop.

Power Cord and Side Cutter
Next, strip the sheath from approximately 1” of the wire, as shown below. Do this for both pieces.

Wire Stripper
You will see a white sheathed wire, and a bunch of bare wires. Aggregate the bare wires into a group and twist them together as shown below. Do this for both pieces.

Aggregate the Bare Wires
Use heat shrink to cover the twisted bunch of bare wires. Do this for both ends. In this step, the goal is to leave about ¼” exposed for crimping.
Also, strip a ¼” of sheath from the white sheathed wire.

Heat Shrink
Don’t forget to shrink it with your heat gun!
It’s time to crimp the pins on each of the two pieces. The end that crimps around the sheathed wire is called the “insulation crimp”. You may have to trim the insulation crimps if they are too long. Good thing you bought spare parts!

Crimp Cable End
Crimp the MALE pins to the Power Adaptor piece and the FEMALE pins to the Laptop piece. First, crimp the section closest to the pin around the bare leads, as shown below. This will require a small size on the crimp tool. Remember to perform a simple tug-test to ensure you have chosen the right crimp size. Because of the small size, we recommend soldering the wire crimp before crimping the insulation crimp.

Female Crimp Cable Ends
Next, crimp the pins to the sheathed wire, as shown below. This will require a slightly larger size on the crimp tool.

Female Crimp Cable Ends
Now that each end is crimped, be sure to slide a piece of heat shrink over the pins and down the wire for later use. This step is shown below. Do this for both pieces.
Heat Shrink
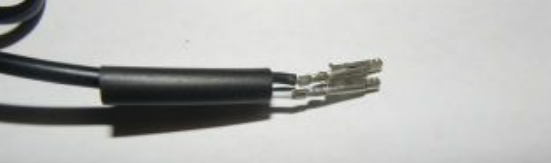
Now the pins need to be inserted into the housings. The MALE housing with the clip (shown below) must go on the Laptop piece, while the FEMALE housing must go on the Power Adaptor piece. Please note the location of each of the pins with respect to the orientation of the housing, shown below for the Laptop piece. For the power adaptor piece it is a simple matter of aligning the housings and ensuring that black goes to black and white goes to white. WHITE IS POSITIVE.

Male Molex Connector
Verify that the positive wire is connected to the inside of the barrel plug. Next, verify that there is not a short between the pins. To test the voltage, plug the Laptop section into the Kuboki’s 19v port and power on. Don’t be alarmed that your housing doesn’t have 6 pins, it will still fit. The outside of the barrel plug should be ground. The inside should measure +19V. You’re done!
Power Adaptor section:

Female Molex Connector
Laptop section:
Male Molex Connector
Final Mating Product!

Connected